Making Smoked Cheese by Cold Smoking

Different cheeses to be smoked


When people think of smoked food, they think of barbecuing brisket, pork ribs, Boston butt (for pulled pork), etc. Little do people realize that you can smoke cheese as well. I don't know anyone who dislikes cheese unless you're lactose intolerant, but if you love cheese, then certainly you'll love smoked cheese. Grilled cheese sandwiches, nachos, and cheese/crackers get that much better when using smoked cheese. It's amazing how smoke can totally enhance regular cheese. You're probably wondering how you can smoke cheese without melting it. That's why you have to cold smoke it. Cold smoking is a technique in which you still produce smoke with very little or minimal heat. When you smoke food, you're both cooking it and adding some smoke flavor to it. With cold smoking, on the other hand, you're just adding the smoke. Cheese must be cold smoked, but you can also cold smoke nuts, salt, butter, etc.

Cheeses (clockwise from top-left): cheddar, Gouda, Monterey Jack, pepper jack
Cheeses (clockwise): cheddar, Gouda, Monterey Jack, pepper jack

Smoked cheese can sometimes be expensive, so I tend to smoke cheddar, gouda, monterey jack, and pepper jack cheese. Other softer cheeses like brie and mozzarella are prone to melt easily, so I stay away from those. I've tried smoking manchego (a cheese from Spain), but the flavor of the manchego seemed to conflict with the smokiness and is better suited unsmoked. I find that cheddar (particularly sharp) and Gouda lend themselves very well for smoke. Definitely experiment with other cheeses though like Swiss, Havarti, Colby, Parmesan, Edam, etc. I'd actually be interested in smoking blue cheese and put it in a salad or spread it in a sandwich or burger. Whatever cheese you choose to smoke, be sure to remove any red cheese wax or any hard rind which may prevent smoke from adhering to the part of the cheese you're going to be consuming.

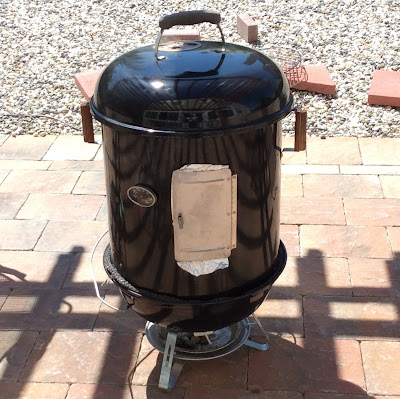
My charcoal smoker: a modded Brinkmann (ECB) and Weber Jumbo Joe hybrid

The smoker I have is a modded Brinkmann (aka ECB or El Cheapo Brinkmann) and Weber hybrid. I use the base and lid from a Weber Jumbo Joe charcoal grill and combine that with the barrel of a Brinkmann to make a smoker that Voltron would be proud of. It basically works the same way as the Weber Smokey Mountain would when combined. For my smoker I left the top vent halfway open and the bottom vent slightly less that half open.

Filling a tube smoker with hickory wood pellets

The primary source of fuel that I use for cold smoking is Traeger wood pellets from Costco. Burning these wood pellets produces the smoke needed in much the same way that burning wood chips or chunks would. You can get pellets of commonly used wood for bbq like hickory, apple, cherry, oak, alder, pecan, mesquite, etc. My personal preference is hickory because I like the strong flavor of hickory versus the more milder fruit woods. The smell and taste of hickory to me is the flavor of bbq, but any wood would do. The reason why I use pellets is because they're easy to put inside a smoker tube. Once the tube is filled with pellets, you can then light one end of it using a butane torch (I actually use a Weber lighter cube since I don't have a butane torch). The wood pellets would slowly burn kind of like a candle. The smoker tube I have is 12 inches in length and that usually burns and produces smoke for 3 to 4 hours which is plenty sufficient to impart some smokiness onto your cheese. In cold smoking, you're not using any charcoal at all, so only burning these wood pellets produces very little heat.

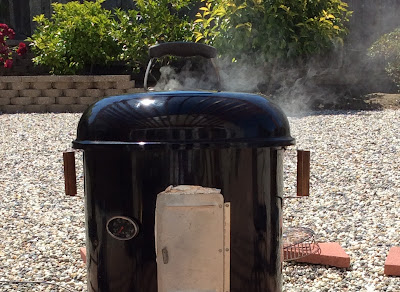
My water smoker in action and chugging away

The usual temperature for smoking meat is 225° to 250° F. With cold smoking, you want to keep the temperature low. Somewhere below 100° is ideal. In today's smoke, the temperature actually went up to 110° or so, but that was still ok. Even though you're producing very little heat by using a smoker tube, you'd be surprised that the temperature in your smoker can still go up and be enough to totally melt cheese. You may still need to take additional steps to further lower the temperature.

Cheese engulfed in smoke and soaking it in

Even though grilling season and barbecuing usually occurs in the summer months, it's common for people to only cold smoke during the winter time when it's already cold out. Cold smoking in the summer may be difficult at best, but certainly feasible. Not only that, but it's advantageous that your smoker or grill is under some shade and not exposed to the hot sun. Another way to keep the smoker environment cold is to put a pan of water and/or ice to further keep the temperature down. This acts as a heat sink to absorb heat, so that the cheese doesn't get any of it. Since my modded smoker is a water smoker, there's already a pan for water and ice. If you just have a regular charcoal or gas grill or any other smoker, then you can just put a disposable pan filled with water and ice somewhere inside. When you smoke meat, you're not supposed to check on it because doing so will let out valuable heat. When you cold smoke cheese, it's actually to your advantage to open the lid every so often to let that heat out. You definitely don't want that heat to warm up the inside of your smoker.

Optimal cold smoking temperature: 100° F or less

As mentioned previously, I smoke cheese for about 3-4 hours or until the wood pellets in the smoker tube are all burned out. Half way through the smoking process, I'll usually flip the cheese over in case certain sides of the blocks of cheese aren't getting as much smoke. This isn't necessary, but I just do it anyway. Once the cheese is done smoking, I let it rest at room temperature for a bit (say 20-30 minutes). During this time, I pat it down with a paper towel to remove any excess oil on the surface. Then, I wrap it in plastic wrap (or better yet vacuum seal it if you have one of those vacuum sealers), put in a zip lock bag, and place it in the refrigerator. I wait at least a week before eating it in order to allow the smoke flavor to permeate from the surface of the cheese to the inside. The longer you wait, the better it'll taste, but I've been known to eat smoked cheese as early as the next day. Whenever I smoke cheese, I smoke a lot of it anyway. It'll take me at least a week just to eat one block of cheese, so by that time the other blocks will have already matured.

Smoked cheddar (top) and pepper jack (bottom) cheese

Smoked Monterey jack (top) and Gouda (bottom) cheese

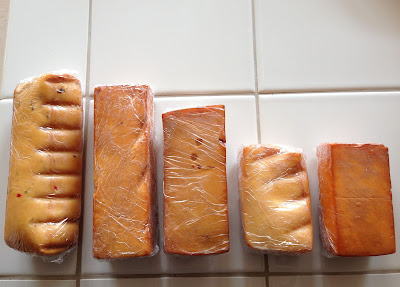
In the end the cheddar held up well to the heat. The Monterey jack, pepper jack, and Gouda cheeses melted slightly that they got deformed a bit and lost a little bit of its shape, but didn't totally melt and make a mess at the bottom of my smoker. The smoking process darkens the cheese surface giving it a tanned or dark orange tint to it after being exposed to smoke (see picture below). The Gouda and Monterey Jack cheeses were nearly indistinguishable based on only the color. I would recommend cutting different cheeses similar in color a different shape prior to smoking in order to be able to tell what cheese is what. I like serving smoked cheese with crackers anytime I host a party at my house. People always seem to like the cheese platter consisting of smoked cheeses, but I also like to give it to friends, family, and coworkers. It definitely makes a great gift for any cheese lover.

Discoloration of smoked cheese
Note the discoloration of the (Monterey jack) cheese surface exposed to smoke

Smoked cheese wrapped and ready for refrigeration: (L-R) pepper jack, extra sharp cheddar, Gouda, Monterey Jack, sharp cheddar

Shake Shack moves out West

Great news everyone! If you've ever been to New York, then surely you must have tried the legendary burger at Shake Shack. Shake Shack, a fast-food type restaurant chain known for its burgers, fries, shakes, etc., has announced it will be moving out West. I just heard this on the radio this morning. Shake Shack is based out of New York, and I guess there was such a demand for it out here in California even though we already have In-N-Out Burger (which is an institution here in its own right). Unfortunately, they will be settling in Los Angeles which leaves the rest of the West Coast out to dry. But that doesn't mean that they won't be putting up more Shake Shacks in the rest of the state. Perhaps, they're putting one in LA first to test out the waters and if it's doing well, we'll see some pop up in the Bay Area as well - that's what I'm hoping for at least.

[Update Dec. 2018] Wonderful news everyone! Shake Shack has now opened up in Northern California with its first Bay Area location in Palo Alto where people lined up in long lines to finally taste the Shake Shack burger. There will be additional Shake Shack locations in San Francisco and Marin as well which will be opening up soon enough.

The original Shake Shack in Madison Square

Fun Food Fact: National Grilled Cheese Sandwich Day

Today (April 12) happens to be the day honoring a classic American sandwich - the grilled cheese sandwich. Yes, today is National Grilled Cheese Sandwich Day. The grilled cheese sandwich in its simplest form consists of two pieces of sliced bread,a layer of cheese, and some butter as its base configuration. A little bit of butter is spread on the outside surface of the sandwich after the sandwich is formed. The sandwich is then grilled on both sides on a griddle so that the surface is slightly browned and lightly toasted which gives a nice crunch when biting into it. By the time both sides are toasted, the cheese in the middle is melted and forms a nice gooey layer to contrast the crunch from the bread. When cutting into it, it's always nice seeing the melted cheese ooze out. For me the grilled cheese sandwich is often associated with comfort food and is often a nice remedy the next day after a night of heavy drinking. Today grilled cheese sandwiches have become more "gourmet" with restaurants (ie The Melt) and food trucks specializing in this sandwich popping up all over the place. You'll see more ingredients in each sandwich - avocado, bacon, ham, various cheeses, and different kinds of bread (not just your standard white bread). For some reason the grilled cheese sandwich is often paired with tomato soup also. In honor of National Grilled Cheese Day, I think I may have to get myself a grilled cheese sandwich for lunch today.

April 12: National Grilled Cheese Sandwich Day

Happy Pi(e) Day!

Happy Pi Day everybody! Today (March 14) is Pi day in honor of that famous mathematical constant (3.14). Although Pi day occurs once every year, this year it's extra special since it's 2015. The next 2 digits in the Pi sequence is 1 and 5 making it 3.1415, and today's date is 03/14/15. Isn't that cool? As children, we always had to memorize this number whenever we had to work with circles, but I actually didn't know what it meant until that movie Life of Pi came out. They mention that Pi is the ratio of a circle's circumference to its diameter. But if math and numbers just isn't your thing, then you can just think of pie as the dessert variety: apple, pumpkin, blueberry, cherry, etc. Add a scoop of vanilla ice cream and make it a la mode!

March 14, 2015: Happy Pi Day (3/14/15)

Quick Cooking Tip: Storing Root Vegetables

If you enjoy having fresh ingredients, then you might want to know how to properly store your root vegetables. It is important to know how to store these vegetables in order to prolong its freshness and to avoid having them go bad before you get a chance to use them. It will definitely be a waste if they do go bad. Root vegetables include carrots, potatoes, turnips, beets, etc.

Store potatoes in a cool, dark place
Potatoes

For potatoes you need to store them in a dark, dry, cool place. You can put them in a brown paper bag and store them in a lower shelf or cupboard. Keep in mind that you must remove the already spoiled potatoes from the batch in order to avoid having that bad potato contaminate the other potatoes.

Store carrots in your refrigerator drawer
Carrots

Store turnips in your refrigerator drawer
Turnips

Store beets in your refrigerator drawer
Beets
Carrots, beets, and turnips, on the other hand, should be stored in your refrigerator drawer. Now here is a tip that I wasn't aware of before: you must cut off the leafy green tops for these vegetables. The reason why you need to remove them is because if you don't, then your vegetables will dehydrate more quickly. You can, however, save those leafy greens for soups and salads, so they won't go to waste.

Divorce for Food Network's Giada De Laurentiis

Food Network chef and Everyday Italian host Giada De Laurentiis has announced on her website that her and her husband and fashion designer Todd Thompson will divorce after eleven years of marriage (they actually separated back in July of 2014):

This means that the very beautiful and lovable Giada, 44, is single again fellas! Not only is she cute as a button, but she is known for her Italian cooking on the Food Network with such dishes as chicken piccata and spaghetti with meatballs. Giada and Todd have one child, Jade Marie, together born in March 2008. Jade was named after her mom since the word "Giada" is Italian for "Jade". It is rumored that Giada cheated on her husband with Today Show anchor Matt Lauer (that guy is such a douche bag). On a side note, doesn't Giada kind of resemble Black Swan actress Natalie Portman? Check her out in a bikini below.

Divorce for Food Network chef Giada De Laurentiis
Food Network Chef Giada De Laurentiis

Sexy and lovely Giada de Laurentiis in a skimpy bikini in Bora Bora
Giada in Paradise (Bora Bora)

America's Test Kitchen: New York Thin Crust Pizza

[scroll down to view recipe and video]

America's Test Kitchen: New York Thin Crust Pizza
Pizza is one of my favorite dishes to eat as a kid and in fact I'm sure many kids across America would agree with me on that statement. You can find many of them having pizza parties at such establishments as Chuck E. Cheese, Round Table, Pizza Hut, Toto's, Straw Hat, or Papa John's or maybe even having it delivered to your door or ordered to pick up at Dominoes, Papa Murphy's (take and bake), and Little Caesars. There are many different kinds of pizzas out there. There is Chicago style deep dish pizza, Sicilian Pizza, flatbread pizza, New Haven style pizza, and Neapolitan pizza (of which you can find Margherita pizza). Among all the different kinds of pizzas out there, my favorite is the New York style thin crust pizza. New York style pizza was popularized by pizzerias like Di Fara (Dom De Marco), Grimaldi's, John’s of Bleecker Street, and Lombardi's (of Gennaro Lombardi) popping up all around New York. In the America's Test Kitchen episode "New York-Style Pizza at Home" (season 12, episode 8), the test kitchen shows us how to properly make a New York-Style Thin-Crust Pizza.

Thinness of a slice of New York style pizza
See how thin a New York style pizza turns out.
What I like about New York style thin crust pizza is simply because it's thin. Thicker pizzas tend to be doughy and with each bite you would get a disproportionate amount of bread to everything else (pizza, sauce, toppings). A lot of pizzerias in New York have a special commercial oven to bake these pizza pies. These ovens can reach up to 1000 degrees Fahrenheit in temperature which would fully bake a pizza in minutes if not seconds. I unfortunately do not have a commercial oven nor a wood burning oven in my home, so you would think that making a New York thin style pizza is next to impossible at home. But no. That is until you see the technique that ATK utilizes. They put a pizza stone on the very top rack of the pizza and preheat it for up to an hour to mimic the ovens they use in pizzerias. Once the pizza stone is properly preheated, the top portion of the oven where the pizza will go will be hot enough to cook a pizza.

Another technique which I have never seen before until now is how they make the dough. They make the dough and then run it through a food processor. You're probably wondering why would you use a food processor since you don't intend to puree the dough. The thing is, when making bread dough, you must knead it in order for it to develop gluten which will give the dough structure and allow it to rise again. The trapped the gases from the yeast give your bread flavor and the gluten gives the bread a chewy texture. Back in the day, people would simply knead the dough by hand which could take a long time. You can also knead the dough with an electric mixer with the proper dough hook attachment which could still take a few minutes. The food processor, however, can knead the dough in a mere seconds saving you a whole lot of time. Be aware that if you plan to use a food processor to knead your pizza dough, be sure it's powerful enough for dough. When I first tried this recipe, I used a food processor that wasn't strong enough for the dough that the dough made the food processor stop in its tracks. As a result, I ended up just getting the same exact food processor that Bridget Lancaster uses in the video since I already knew that that model of food processor could do the job.

You want a bit of char on the bottom
The bottom of a New York style thin crust pizza turns golden brown and charred.
When you have your dough ready, you have to roll out the dough into a 14 inch circle. I had trouble doing this because the dough tended to be sticky even if I properly floured the rolling pin and my marble board. I found it easier to stretch the dough by hand the way they do it in pizzerias. You can look up videos on YouTube to see how to do it, but the premise is simple. You press the dough into a disc. Then, you drape the dough on the tops of your hands (specifically the kuckles) because you don't want your fingers to puncture the dough. Once the dough is resting on your hands, you pull your hands away from each other and, thereby, stretch it. Once that portion of dough is stretched, you shift over to the next portion and stretch that and so on and so forth. You do this until you get to your desired thickness. For me this method was easier than using a rolling pin, but if the rolling pin technique works for you, then definitely go with that. Once you have your dough rolled out, add the pizza sauce, cheese, and any other toppings you wish.

Another part of making a pizza at home which proved to be challenging was sliding the pizza onto the baking stone from the pizza peel. I know they mentioned to use a lot of cornmeal which would allow you to easily transfer the pizza, but they always seem to make it look easier on tv than in reality. Whenever I tried sliding the pizza from the peel, the pizza would stick to the peel and the toppings would fly off as I'm trying to transfer the pizza. As an alternative, I formed the pizza on an oiled metal pizza sheet. I used 1 tablespoon of canola oil on the pizza sheet and put the stretched out dough on the sheet and prepared the pizza on that. I then put both the pizza and the pizza sheet in the oven to bake for a few minutes. What's great about this method is that the oil on the baking sheet allows the bottom of the pizza to fry a bit which gives good flavor. Half way through the baking process, you can then slide easily slide the pizza off from the pan directly on the baking stone since the dough is cooked enough that it no longer sticks to the pan.

Fresh baked NY Style Pizza
Homemade pizza fresh out of the oven.
I really like this recipe for New York style thin crust pizza at your home. What's great is that you can prepare several batches of pizza dough, pizza sauce, and cheese and make a pizza bar with a wide variety of toppings anytime you have guests over or have a social gathering. This is a great idea if you're hosting a Super Bowl party for example. You can allow your guests to customize their own pizza pie using whatever ingredients and toppings they like since baking the pizza doesn't take too long. If you read my post on Chicago style deep dish pizza, then you'd know that I like my pizza with pepperoni, green bell peppers, onions, and mushrooms. I sometimes like adding cooked Italian sausage and olives as well, but those do not normally come standard on my customized pizza.

FlavorFool's Notes

  • I didn't use the red wine vinegar. I'm pretty sure NY pizzerias don't use this ingredient either.
  • I don't like rolling out the dough with a rolling pin. I prefer to use my hands and form the pie in that fashion.
  • I do like to add some bits of basil into the tomato sauce.
  • I coat a pizza pan with some oil and I bake the pizza on a pizza pan for the first few minutes so that the bottom fries and then I transfer the pizza onto the stone. I found it difficult transferring an unbaked pizza from the peel onto the stone even if I use a lot of cornmeal or flour.
  • New York-Style Thin-Crust Pizza Recipe

    America's Test Kitchen - season 12, episode 8, New York-Style Pizza at Home
    Makes two 13 inch pizzas

    Ingredients

    Dough
    1 1/3 cups ice water (about 10.5 oz)
    3 cups (16 1/2 ounces) bread flour, plus more for dusting work surface
    1 tbsp vegetable oil, plus more for work surface
    .5 tsp instant or rapid-rise yeast
    1.5 tsp salt
    2 tsp sugar

    Sauce
    1 (28 oz) can whole peeled tomatoes, drained and liquid discarded
    1 tsp red wine vinegar [I left this out]
    1 tbsp extra-virgin olive oil
    2 medium garlic cloves, minced or pressed through garlic press (about 2 tsp)
    1 tsp dried oregano
    .25 tsp ground black pepper
    1 tsp salt

    Cheese
    8 oz whole milk mozzarella cheese, shredded (about 2 cups)
    1 oz finely grated Parmesan cheese (about .5 cup)

    Instructions

    1. FOR THE DOUGH: In food processor fitted with metal blade, process sugar, yeast, and flour until combined, about 2 seconds. With machine running, slowly add water through feed tube; process until dough is just combined and no dry flour remains, about 10 seconds. Let dough stand 10 min.

    2. Add salt and oil to dough and process until dough forms satiny, sticky ball that clears sides of workbowl, 30-60 seconds. Remove dough from bowl and knead briefly on lightly oiled countertop until smooth, about 1 min. Shape dough into tight ball and place in large, lightly oiled bowl. Cover tightly with plastic wrap and refrigerate for at least 24 hrs and up to 3 days.

    3. FOR THE SAUCE: Process all ingredients in food processor until smooth, about 30 seconds. Transfer to medium bowl or container and refrigerate until ready to use.

    4. TO BAKE THE PIZZA: 1 hr before baking pizza, adjust oven rack to second highest position (rack should be about 4 to 5 inches below broiler), set pizza stone on rack, and heat oven to 500 degrees. Remove dough from refrigerator and divide in half. Shape each half into smooth, tight ball. Place on lightly oiled baking sheet, spacing them at least 3 inches apart; cover loosely with plastic wrap coated with nonstick cooking spray; let stand for 1 hr.

    5. Coat 1 ball of dough generously with flour and place on well-floured countertop. Using fingertips, gently flatten into 8 inch disk, leaving 1 inch of outer edge slightly thicker than center. Using hands, gently stretch disk into 12 inch round, working along edges and giving disk quarter turns as you stretch. Transfer dough to well-floured peel and stretch into 13 inch round. Using back of spoon or ladle, spread .5 cup tomato sauce in thin layer over surface of dough, leaving 1/4-inch border around edge. Sprinkle 1/4 cup Parmesan cheese evenly over sauce, followed by 1 cup mozzarella. Slide pizza carefully onto stone and bake until crust is well browned and cheese is bubbly and beginning to brown, 10-12 mins, rotating pizza halfway through. Remove pizza and place on wire rack for 5 mins before slicing and serving. Repeat step 5 to shape, top, and bake second pizza.

    TOPPING TIPS: We like our Thin-Crust Pizza simply dressed with tomato sauce and handfuls of shredded mozzarella and Parmesan, but additional toppings are always an option - provided they're prepared correctly and added judiciously. (An overloaded pie will bake up soggy.) Here are a few guidelines for how to handle different types of toppings:

    MEATS Proteins (no more than 4 oz per pie) should be precooked and drained to remove excess fat. We like to poach meats like sausage (broken up into 1/2-inch chunks), pepperoni, or ground beef for 4 to 5 mins in a wide skillet along with 1/4 cup of water, which helps to render the fat while keeping the meat moist.

    DELICATE VEGETABLES AND HERBS Leafy greens and herbs like basil and spinach are best placed beneath the cheese to protect them or added raw to the fully cooked pizza.

    HEARTY VEGETABLES Aim for a maximum of 6 oz per pie, spread out in a single layer. Vegetables such as mushrooms, peppers, and onions should be thinly sliced and lightly sautéed (or microwaved for a minute or two along with a little olive oil) before using.


    ATK Chef Bridget Lancaster shows Chris Kimball how to make a New York style thin crust pizza at home.

    America's Test Kitchen: Indoor Pulled Pork BBQ

    [Scroll down to view recipe and video]

    When people think of bbq, they often think of ribs, brisket, beer can chicken, etc. One of my favorites when it comes to bbq is pulled pork which is not to be confused with carnitas (Mexican pulled pork). Eating pulled pork sandwiches with some tangy bbq sauce is just heaven for me. Who doesn't like a pulled pork sandwich? You don't even need to be from Texas, Memphis, or Kansas City to make some good bbq either.

    America's Test Kitchen Indoor Pulled Pork BBQ Sandwich
    Classic BBQ: Pulled Pork Sandwich served with a pickle
    I especially love it when one of my coworkers would bring pulled pork for us whenever we have a potluck in the office. He is lucky enough to have one of those big green eggs which he uses to smoke the pork shoulder for several hours. The smoking process cooks the meat low and slow so that it cooks properly and the collagen has time to break down making the meat moist and tender. Not only that, but the pulled pork has an added smoky flavor to it. The problem with smoking is properly maintaining a low enough temperature since you don't want the temperature too high which would overcook your meat. Also, most likely you'd be smoking it outside for several hours. This could be a problem for some people since winter is just around the corner and grilling/bbqing/smoking is just not as fun when the weather isn't warm. I know the Neelys (from the Food Network show Down Home with the Neelys and known for their good bbq) have a pretty good recipe for pulled pork, but it's a good thing America's Test Kitchen (season 11, episode 11: Southern Fare: Reinvented) shows us that we can still make some good pulled pork in the comfort of our own home. What's great is that we can still obtain the smoky flavor without the smoking process with the use of liquid smoke. I mut say that that liquid smoke is a great invention.

    If you don't know, pulled pork usually comes from pork shoulder or pork butt (often called Boston butt). And no, the pork butt is NOT the same as the pig's butt if you were wondering. It's a completely different cut altogether that comes from the upper portion of the shoulder. It's an inexpensive cut, but when cooked properly (usually low and slow), it can turn out to be quite flavorful, tasty, and tender. I ended up using a three pound boneless pork shoulder when making this recipe. I think 3 pounds is considered small when it comes to pork shoulders, but I would definitely use a bigger cut anytime I had to make this for a party or family get together.

    Shredded BBQ Pulled Pork
    Pork after being pulled and ready to be eaten.
    The bbq sauce that goes with the pulled pork is actually pretty good because you're using the juices that came from the pork as a base for the sauce. When following this recipe, I hate to admit it, but sometimes I don't make the corresponding bbq sauce. I'm not going to lie - I get extra lazy sometimes. On those occasions when I don't make the bbq sauce, I just use a bottle of my favorite store bought bbq sauce which is Sweet Baby Ray's (KC Masterpiece and Bull's-Eye are good too). I like Sweet Baby Ray's because it doesn't have that "medicine" and artificial flavor that other barbecue sauces have. Whether you made bbq sauce or are using a bottle of sauce from the grocery store, I definitely use a lot of it and a little bit more when adding it to the pulled pork. I like my pulled pork sandwiches to be very juicy and slathered in bbq sauce. It's a pulled pork sandwich. It's supposed to be messy!

    I do like adding sliced pickles to the pulled pork sandwich or eating a pickle on the side with the sandwich. I also like coleslaw in my sandwich or at least some cornbread, baked beans, mac & cheese, or collared greens on the side. I find the crunch from the cabbage to be a nice contrast to the tenderness of the pork. I usually just buy coleslaw from the store deli if I'm making pulled pork sandwiches since I haven't found a good slaw recipe that works for me unless there's someone out there that has a good recommendation. Anyone know of a good coleslaw recipe? Anyone? Bueller? Lastly, bread selection is key to a good pulled pork sandwich. I've tried hamburger buns, brioche buns, and sliced bread (I prefer wheat bread over white bread though) which work well. I don't like the hard, crusty breads like ciabatta because it's too heavy/doughy and I like a softer bread for a pulled pork sandwich. I do, however, like using King's Hawaiian bread rolls for pulled pork sliders. I find that King's Hawaiian rolls have a sweet flavor that really complements the bbq sauce. These sliders work well for tailgating if you prepare the meat the night before the big game. Basically, just choose a bread that you like and whichever bread you do choose, toast it on the side where it was cut if using a roll or hamburger bun. I like bread toasted in this fashion - it's toasted on the side where the pork is and it is still soft on the other.

    FlavorFool's Notes

  • Sometimes I don't bother making the homemade barbecue sauce if I'm short on time. I end up using Sweet Baby Ray's barbecue sauce instead.
  • I like using King's Hawaiian rolls to make pulled pork sliders.
  • I used another recipe for the gravy since it has been in the family for decades.
  • I like using Tapatio hot sauce.
  • Indoor Pulled Pork with Sweet and Tangy Barbecue Sauce

    America's Test Kitchen - season 11, episode 11, Southern Fare: Reinvented
    serves 6 to 8

    Ingredients

    Pork
    1 boneless pork butt (about 5 lbs), cut in half horizontally
    .5 cup plus 2 tbsp sugar
    1 cup plus 2 tsp table salt
    .25 cup yellow mustard
    3 tbsp plus 2 tsp liquid smoke
    1 tsp cayenne pepper
    2 tbsp smoked paprika
    2 tbsp ground black pepper

    Sweet and Tangy Barbecue Sauce
    .25 cup light or mild molasses
    1.5 cups ketchup
    1 tbsp hot sauce [I like using Tapatio hot sauce]
    2 tbsp Worcestershire sauce
    .5 tsp ground black pepper
    .5 tsp table salt

    Instructions

    1. FOR THE PORK: Dissolve 3 tbsp liquid smoke, .5 cup sugar, and 1 cup salt in 4 quarts cold water in a large container. Submerge pork in brine, cover with plastic wrap, and refrigerate for 2 hrs.

    2. While pork brines, combine remaining 2 tsp liquid smoke and mustard in small bowl; set aside. Combine paprika, black pepper, cayenne, remaining 2 tsp salt, and remaining 2 tbsp sugar in second small bowl; set aside. Adjust oven rack to lower-middle position and heat oven to 325 degrees.

    3. Remove pork from brine and dry thoroughly with paper towels. Rub mustard mixture over entire surface of each piece of pork. Sprinkle entire surface of each piece with spice mixture. Place pork on wire rack set inside foil-lined rimmed baking sheet. Place piece of parchment paper over pork, then cover with sheet of aluminum foil, sealing edges to prevent moisture from escaping. Roast pork for 3 hrs.

    4. Remove pork from oven; remove and discard parchment and foil. Carefully pour off liquid in bottom of baking sheet into fat separator and reserve for sauce. Return pork to oven and cook, uncovered, until well browned, tender, and internal temperature registers 200 degrees on instant-read thermometer, about 1.5 hrs. Transfer pork to serving dish, tent loosely with foil, and let rest for 20 mins.

    5. FOR THE SAUCE: While pork rests, pour .5 cup of defatted cooking liquid from fat separator into medium bowl; whisk in sauce ingredients.

    6. TO SERVE: Using 2 forks, shred pork into bite-sized pieces. Toss with 1 cup sauce and season with pepper and salt. Serve, passing remaining sauce separately.


    Video: America's Test Kitchen Indoor Pulled Pork